Scale of cells
Cell theory
Intro to cells
Introduction
Close your eyes and picture a brick wall. What is the basic building block of that wall? A single brick, of course. Like a brick wall, your body is composed of basic building blocks, and the building blocks of your body are cells.
Fortunately, your cells are way more interesting than bricks. (Just as you, undoubtedly, are much more interesting than a brick wall!) Bricks are generally square-shaped, like all other bricks, while cells can have many shapes—round, square, spindle-shaped, and star-like. Bricks generally stay put, while many types of cells will happily migrate from one place to another. And if you slice a brick in half, you just find more brick, while if you slice a cell in half—which is a good trick, given how tiny they are—you’ll find an intricate and beautiful array of specialized structures that help the cell perform its function. Yes, cells are building blocks, but they’re the most amazing building blocks in the world!
Cells perform a huge number of different roles within your body. For example, epithelial cells protect the outside surface of the body as part of the skin and cover the organs and body cavities within. Bone cells build up bones to provide support for the body. Cells of the immune system fight invading bacteria. Blood and blood cells carry nutrients and oxygen throughout the body while removing carbon dioxide. Each of these cell types plays a vital role in the growth, development, and day-to-day maintenance of the body.
In spite of their enormous variety, however, cells from all organisms—even ones as diverse as humans, onions, and bacteria, shown from left to right in the pictures below—share certain fundamental characteristics. We’ll explore these more in the articles to come. Here, we’ll take a quick peek at cell theory and at how cells were first discovered.

Image credit: modified from "Introduction: Figure 1" by OpenStax College, Biology, CC BY 3.0; a: modification of work by Ed Uthman, MD; b: modification of work by Umberto Salvagnin; c: modification of work by Anthony D'Onofrio, William H. Fowle, Eric J. Stewart, and Kim Lewis of the Lewis Lab at Northeastern University; scale-bar data from Matt Russell
Cell theory
It may seem obvious now that we, and other living things, are made up of cells. Prior to the 1600s, however, it wasn’t obvious at all, for the simple reason that no one had ever seen a cell up close and personal. To distinguish individual cells in a piece of tissue or individual bacteria in a sample of liquid required the development of relatively high-powered microscopes, instruments used for magnifying objects otherwise too small to be seen. For more on how microscopes are used in biology today, check out the article on microscopy.
The first person to observe cells as microscopic structures was the British scientist Robert Hooke. In fact, he was the person who gave cells their name. In his book Micrographia, he used the term cell to refer to the box-like structures he saw when he looked at dead cork tissue through a simple microscope\[^1\]. He chose cell as the name because these boxes reminded him of the cells of a monastery, the simple rooms in which monks slept\[^2\].
The cells that Hooke observed, however, were in dead tissue, and were in fact cell walls left behind after the death of the real cells. The first person to observe living, moving cells was Anton van Leeuwenhoek, a Dutch shopkeeper and crafter of lenses. In the 1670s, inspired by Hooke’s book, he began to build his own, more powerful microscopes\[^3\]. With these, he was able to observe living single-celled organisms—such as bacteria—and sperm cells, which he collectively called animalcules.
Despite the discovery that cells existed, it took quite some time for scientists to realize that they weren’t just an odd fringe case, but rather, the essential building blocks of all plants, animals, and other living things. In fact, it wasn’t until the 1830s that botanist Matthias Schleiden and zoologist Theodor Schwann put forth a revolutionary idea: all the different parts of plants and animals are made up of cells, and that cells can be produced from other cells\[^4\].
German scientist Rudolf Virchow later added to this theory by stating that all cells must come from other cells—not just that some cells could, under the right circumstances, be formed this way\[^{5}\]. However, he appears to have actually stolen this idea from Polish scientist Robert Remak\[^{6}\].
The ideas of all these early thinkers are summarized in modern cell theory, which states:
All living things are composed of one or more cells.
The cell is the basic unit of life.
New cells arise from pre-existing cells.
That’s all fine and dandy, but it may leave you wondering: if all cells come from cells, where did that first cell come from? We’ll return to that head-scratcher in later articles, when we look at the origins of life.
Microscopy
Introduction
If you meet some cell biologists and get them talking about what they enjoy most in their work, you may find it comes down to one thing: secretly, they’re all microscope freaks. At the end of the day, what they really love is the chance to sit in a small, dark room for hours on end, communing with their favorite cell type through the lens of a beautiful microscope. That may seem odd, but the truth is, cells can be pretty gorgeous, like living stained glass. One of my favorite examples of this is the picture below, which shows cells in a very young leaf of thale cress, a small flowering plant related to mustard.
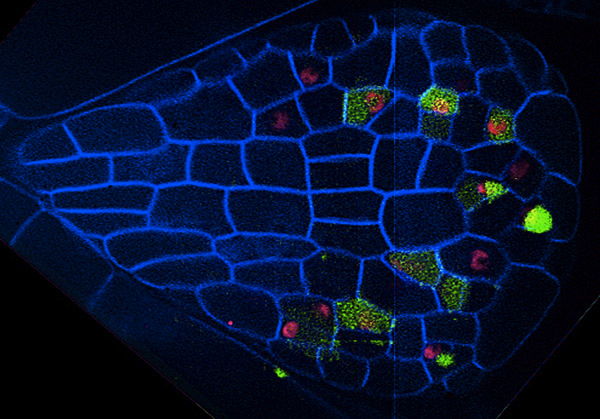
Image credit: Carrie Metzinger Northover, Bergmann Lab, Stanford University.
This picture isn’t a plain light micrograph; it’s a fluorescent image of a specially prepared plant where various parts of the cell were labeled with tags to make them glow. However, this kind of cellular complexity and beauty is all around us, whether we can see it or not.
You could find cells just as intricately patterned and beautifully formed in any plant you looked at – from the rose in your backyard, to the grass growing up through the sidewalk, to the carrots you ate for a snack. Let’s not limit it to plants, either: exquisite layers of cells can be found in your skin, in an insect’s wing, and in just about any other living tissue you choose to look at. We, and the world around us, are cathedrals made of cells. We just need some microscopy to appreciate it.
Microscopes and lenses
Although cells vary in size, they’re generally quite small. For instance, the diameter of a typical human red blood cell is about eight micrometers (0.008 millimeters). To give you some context, the head of a pin is about one millimeter in diameter, so about 125 red blood cells could be lined up in a row across the head of a pin. With a few exceptions, individual cells cannot be seen with the naked eye, so scientists must instead use microscopes (micro- = “small”; -scope = “to look at”) to study them. A microscope is an instrument that magnifies objects otherwise too small to be seen, producing an image in which the object appears larger. Most photographs of cells are taken using a microscope, and these pictures can also be called micrographs.
From the definition above, it might sound like a microscope is just a kind of magnifying glass. In fact, magnifying glasses do qualify as microscopes; since they have just one lens, they are called simple microscopes. The fancier instruments that we typically think of as microscopes are compound microscopes, meaning that they have multiple lenses. Because of the way these lenses are arranged, they can bend light to produce a much more magnified image than that of a magnifying glass.
In a compound microscope with two lenses, the arrangement of the lenses has an interesting consequence: the orientation of the image you see is flipped in relation to the actual object you’re examining. For example, if you were looking at a piece of newsprint with the letter “e” on it, the image you saw through the microscope would be “ə." \[^{1}\] More complex compound microscopes may not produce an inverted image because they include an additional lens that “re-inverts” the image back to its normal state.
What separates a basic microscope from a powerful machine used in a research lab? Two parameters are especially important in microscopy: magnification and resolution.
Magnification is a measure of how much larger a microscope (or set of lenses within a microscope) causes an object to appear. For instance, the light microscopes typically used in high schools and colleges magnify up to about 400 times actual size. So, something that was 1 mm wide in real life would be 400 mm wide in the microscope image.
The resolution of a microscope or lens is the smallest distance by which two points can be separated and still be distinguished as separate objects. The smaller this value, the higher the resolving power of the microscope and the better the clarity and detail of the image. If two bacterial cells were very close together on a slide, they might look like a single, blurry dot on a microscope with low resolving power, but could be told apart as separate on a microscope with high resolving power.
Both magnification and resolution are important if you want a clear picture of something very tiny. For example, if a microscope has high magnification but low resolution, all you’ll get is a bigger version of a blurry image. Different types of microscopes differ in their magnification and resolution.
Light microscopes
Most student microscopes are classified as light microscopes. In a light microscope, visible light passes through the specimen (the biological sample you are looking at) and is bent through the lens system, allowing the user to see a magnified image. A benefit of light microscopy is that it can often be performed on living cells, so it’s possible to watch cells carrying out their normal behaviors (e.g., migrating or dividing) under the microscope.
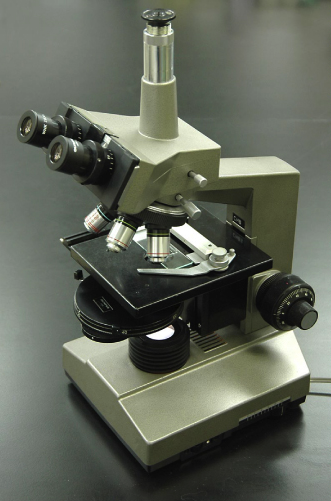
Image credit: OpenStax Biology. Modification of work by "GcG"/Wikimedia Commons.
Student lab microscopes tend to be brightfield microscopes, meaning that visible light is passed through the sample and used to form an image directly, without any modifications. Slightly more sophisticated forms of light microscopy use optical tricks to enhance contrast, making details of cells and tissues easier to see.
Another type of light microscopy is fluorescence microscopy, which is used to image samples that fluoresce (absorb one wavelength of light and emit another). Light of one wavelength is used to excite the fluorescent molecules, and the light of a different wavelength that they emit is collected and used to form a picture. In most cases, the part of a cell or tissue that we want to look at isn't naturally fluorescent, and instead must be labeled with a fluorescent dye or tag before it goes on the microscope.
The leaf picture at the start of the article was taken using a specialized kind of fluorescence microscopy called confocal microscopy. A confocal microscope uses a laser to excite a thin layer of the sample and collects only the emitted light coming from the target layer, producing a sharp image without interference from fluorescent molecules in the surrounding layers\[^{4}\].
Electron microscopes
Some cutting-edge types of light microscopy (beyond the techniques we discussed above) can produce very high-resolution images. However, if you want to see something very tiny at very high resolution, you may want to use a different, tried-and-true technique: electron microscopy.
Electron microscopes differ from light microscopes in that they produce an image of a specimen by using a beam of electrons rather than a beam of light. Electrons have much a shorter wavelength than visible light, and this allows electron microscopes to produce higher-resolution images than standard light microscopes. Electron microscopes can be used to examine not just whole cells, but also the subcellular structures and compartments within them.
One limitation, however, is that electron microscopy samples must be placed under vacuum in electron microscopy (and typically are prepared via an extensive fixation process). This means that live cells cannot be imaged.
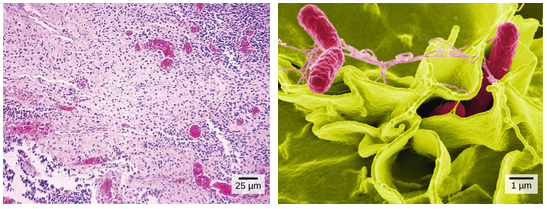
Image credit: OpenStax Biology. Credit a: modification of work by CDC/Armed Forces Institute of Pathology, Charles N. Farmer, Rocky Mountain Laboratories; credit b: modification of work by NIAID, NIH; scale-bar data from Matt Russell.
In the image above, you can compare how Salmonella bacteria look in a light micrograph (left) versus an image taken with an electron microscope (right). The bacteria show up as tiny purple dots in the light microscope image, whereas in the electron micrograph, you can clearly see their shape and surface texture, as well as details of the human cells they’re trying to invade.
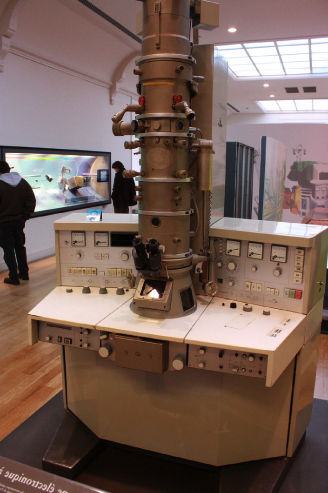
Image credit: OpenStax Biology. Modification of work by Evan Bench.
There are two major types of electron microscopy. In scanning electron microscopy (SEM), a beam of electrons moves back and forth across the surface of a cell or tissue, creating a detailed image of the 3D surface. This type of microscopy was used to take the image of the Salmonella bacteria shown at right, above.
In transmission electron microscopy (TEM), in contrast, the sample is cut into extremely thin slices (for instance, using a diamond cutting edge) before imaging, and the electron beam passes through the slice rather than skimming over its surface\[^5\]. TEM is often used to obtain detailed images of the internal structures of cells.
Electron microscopes, like the one above, are significantly bulkier and more expensive than standard light microscopes, perhaps not surprisingly given the subatomic particles they have to handle!